It’s time to ditch the shampoo bottle
Making soap at home is a fantastic and creative adventure. In addition to being a lot of fun, it saves money and reduces packaging, which is good for the environment as well. To me, soap-making is a fundamental, basic skill of self-sufficiency, one that everyone should seek to learn and use.
It only seemed natural to me that if I was going to make my soap, I should also make my shampoo. I made some liquid shampoos and used them for years. Then one day, I reached for the bottle, only to find it empty. Rather than get out of the shower and get a refill, I decided to use the soap in my hand. That is when I had an epiphany. Why not make shampoo bars instead? That way, there was no need for plastic bottles to be involved in any way. Any idea that helps reduce the plastic in my life is worth a second look.
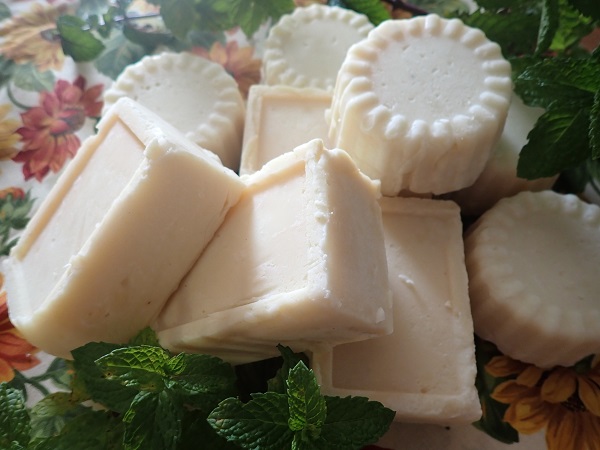
This shampoo bar is easy to make, and your hair feels great. It is so good that I don’t even have to use a conditioner. Give this cold-process shampoo bar a go and you might never use a liquid shampoo again.
Equipment:
Most of the equipment you will need for making cold process soaps at home is already in your kitchen. You will need the following:
- Kitchen scales to accurately measure your ingredients.
- Soap pot. This should be made of unchipped enamel or stainless steel, large enough to hold your batch of soap and allow for stirring and mixing without splashing.
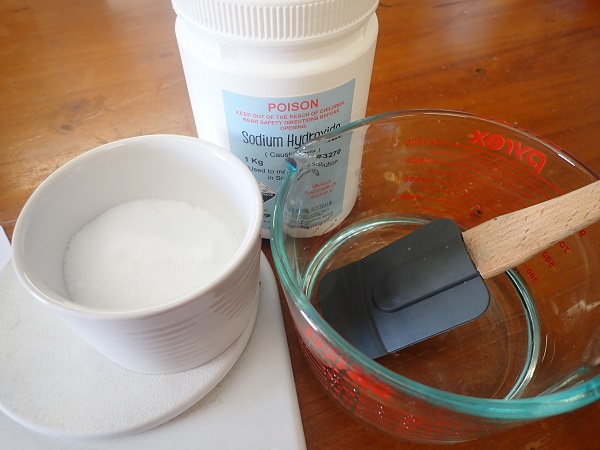
- Heat-resistant jug for mixing your caustic soda (lye) solution. As the solution heats up significantly when caustic soda is added to the water, the jug should be microwave-safe to handle this heat.
- A hand-held or stand-alone mixer or stick blender.
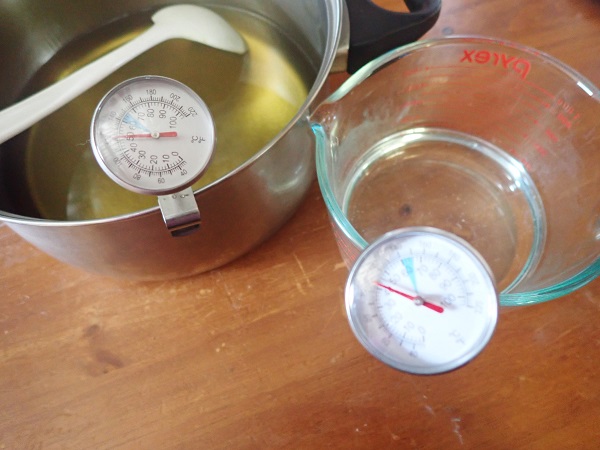
- Two kitchen thermometers that will allow you to measure in the range of 34 to 38 degrees.
- Safety glasses or goggles to protect your eyes whenever you are handling soap-making ingredients.
- Rubber gloves
- Soap cutter or sharp knife
- Soap moulds or a large plastic container to use as a soap mould. An empty cardboard milk carton can make a good soap mould if you do not have something suitable. You can also use individual soap moulds as I have done.
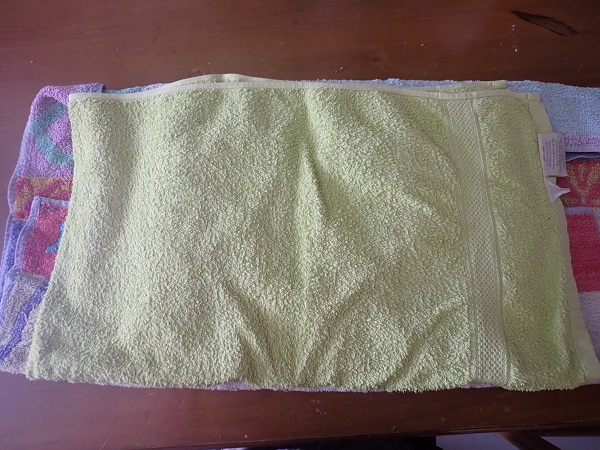
- An old blanket or towel for wrapping your soap once in the mould(s).
- Plastic needlepoint screen, sushi mats, or something similar, to place your soaps on to cure.
Ingredients
- 285 grams of cold, clean water
- 130 grams of caustic soda suitable for soap making
- 225 grams of olive oil
- 225 grams of coconut oil
- 170 grams of sustainable palm oil
- 170 grams of castor oil
- 85 grams of sweet almond oil
- 30 grams of jojoba oil
- 1/4 tsp vitamin E (optional preservative)
- 15 ml essential oil of your choice (optional) I used peppermint.
- Colour (mica, oxide, etc) of your choice (optional)
Safety: Caustic soda, when added to water, increases in temperature significantly. It is also a strong alkaline solution and will burn when it comes into contact with your skin. You must be very careful not to spill or splash any on you at any time during the soap-making process. If you do get any on your skin, immediately rinse it off in cold running water. Always put on your safety glasses or goggles and your rubber gloves before handling caustic soda. Always add caustic soda to the water and not the water to the caustic soda. Even after you have mixed the caustic soda solution with your oils and have a soap, this soap mixture can still burn you, as the saponification process is not complete until the soap is cured, and the soap mixture is still very alkaline and can still burn you.
Instructions:
Before you start your soap-making, gather all the equipment you will need and all your ingredients. There is nothing worse than being partway through a soap recipe and discovering you do not have something you need. As soap making is a time and temperature-sensitive process, you will not be able to stop what you are doing and pop out to the store to pick up what you do not have.
Put on your rubber gloves and your safety goggles. Using accurate kitchen scales, carefully weigh out all your ingredients. I measure my caustic soda first, then place it into a small dry bowl. Then measure your distilled water and place it into your jug. Measure each of your oils and place them all together into your soap pot or stainless-steel bowl.
Mix your caustic soda solution. Always add your caustic soda to your water. DO NOT ADD WATER TO YOUR CAUSTIC SODA. The chemical reaction can cause significant heat production, fizzing, and splattering. Use your wooden spoon to mix the caustic soda into the water. If possible, it is best to do this outside or in a well-ventilated room. You do not want to breathe in any of the fumes that can be created during this initial chemical reaction. Your caustic soda solution will become quite hot and will need to cool down before it can be added to your oil. Once I have my caustic soda solution mixed up, I carefully place one of my thermometers into the jug so that I can monitor the temperature as it cools.
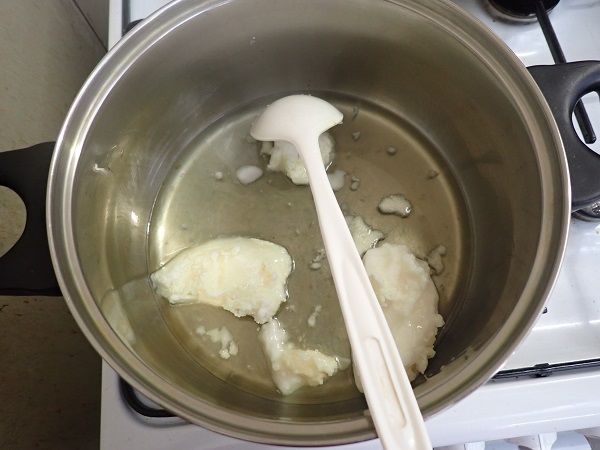
While you are waiting for the caustic soda solution to cool down, melt your solid oils using your soap pot. Add your liquid oils to your melted solid oils, then place your second thermometer into the bowl of oils so that you can monitor the oil’s temperature.
Once you have your caustic soda solution made up and your oils melted, you will need to equalise their temperature until they are the same, somewhere in the range of 34 to 38 degrees. To do this, use hot and/or cold water in the sink and place the jug and/or bowl into the appropriate water.
Once the oils and the caustic soda solution reach the same temperature, or within a few degrees, you are ready to pour your caustic soda solution into your oil mixture. Wearing rubber gloves and your safety glasses, slowly drizzle the caustic soda solution into your oils while mixing. If you are going to use a free-standing or hand mixer, it should be set at its lowest speed. A free-standing mixer allows you to move away when mixing and avoid getting any small splashes on you. If you are using a handheld mixer or stick blender, be sure you have long sleeves and rubber gloves and that the bowl is big enough so that you can work without getting splashed. It is faster with a stick blender.
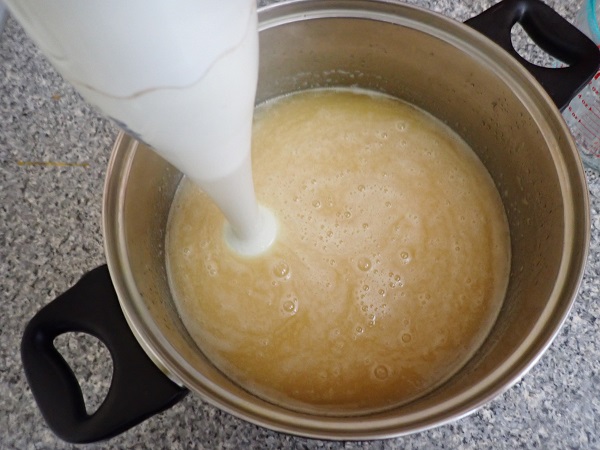
Keep mixing until the soap mixture starts to thicken. As the mixture starts to thicken, you need to test for trace. To test for trace, use a spoon and pick up a small amount of the soap mixture and drizzle it across the top of the remaining soap mixture. If it is not ready, the drizzle will immediately sink back into the soap mixture without leaving a trace. However, as it thickens and you test the mixture again, a small amount of the soap mixture drizzled onto the remaining soap mixture will leave a faint pattern before sinking back into the mixture. This is called a trace. You do not want to wait until the trace is thick enough for the pattern to remain on the surface, as this will be too thick to pour.
Once your soap has reached trace, you are ready to mix in your vitamin E, essential oil, and any colouring you wish to add. Mix these in and then immediately pour your soap.

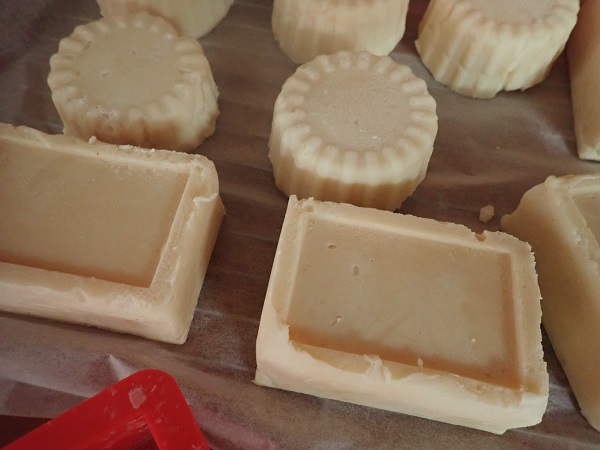
If using silicone soap moulds, place them onto a tray, such as a baking tray. Carefully pour your soap into the mould(s). You can use a spatula to get every bit of soap out. Do not overfill them. If the surface is not smooth from when you poured your soap, give it a little shake, and they will smooth out. Otherwise, if your batch has become thick, smooth it out with a spatula as much as you can. The same applies if you are using some other container as a mould. I used one purchased mould and one that was packaging for muffins someone bought for my home for morning tea.

Cover your soaps with another tray or a cardboard box. Wrap your mould(s) in insulating material such as a blanket or some old towels to keep them warm. Place them in a warm location. I usually use my kitchen, as this is the warmest room in my house.
Allow your soap to sit undisturbed for 24 to 48 hours.
Check your soaps for firmness. They should be firm to the touch but not rock-hard. If it is still too soft to remove from the mould(s) without damaging the shape of the soap, leave it longer. Once it is firm to the touch, simply pop the soap out of the mould. Place your soaps on a plastic needlepoint screen, sushi mats, or something similar, and allow them to cure. You want something that will allow air to circulate around the soap. Turn your soap over once a week.
Allow your soaps to cure for six weeks before using your soap. This allows for the saponification to be completed and ensures your soap is safe to use and is no longer caustic.
I am so happy with my shampoo bars. They are easy to make and easy to use, and I no longer have any plastic bottles in my shower. Shampoo bars are good for you, good for your budget, and good for the planet. Give it a try this Sunday afternoon.
As always, live well.
Valerie
Hello Valerie, is palm oil essential for soap making or could you use something else please?
Hello,
You can use any oils you want and there are Palm free soaps recipes out there. I choose to use palm oil as it is a great oil for soap making and by purchasing sustainable palm oil I am helping subsistence farmers stay on the land and not be forced to sell to the big palm companies who will clear cut the land for plantation palms.
Valerie
Thank you
Hi, I am just delving into making shampoo bars and I wondered if you could help me with the following questions;
1. Does your recipe open up the hair cuticle so it can be cleansed and hydrated?
2. Does the combination of oils you use, leave your hair feeling greasy/oily a couple of days later?
3. Does your shampoo soap smooth down the hair cuticle at the end after rinsed?
4. Is your shampoo bar PH balanced?
I am happy to give your shampoo soap recipe a whirl, but I would also like to make a separate conditioner soap. Could you please tell me if I could supplement one ingredient out of your shampoo recipe and instead use fresh Aloe Vera plant (that I have lots of) to smooth down hair cuticle, therefore acting as a conditioner?
Thank you.
Regards, Mary
Hello Mary:
Hair cuticles open when an alkaline substance is applied. The final pH of my shampoo bars was 8.
I have had no problem with oiliness with this shampoo bar, but if you have really oily hair, or very dry hair, you would get different results. That is why there are different shampoos tailored to different types of hair.
As my shampoo bars are a pH of 8, it is unlikely to smooth (close) the cuticle at the end. You can try an apple cider vinegar rinse if this is an issue for you.
The final pH of my shampoo bars was 8. They were made using the cold process method, so the final pH was not measured until after they were fully cured, 6 weeks after they were made. By then, the pH is the pH and there is noting you can do to “balance” it.
Any changes to the recipe would be trial and error and you would also have to run any changes through a lye calculator. I would try just adding some fresh Aloe Vera to the recipe and see how it goes, without changing any of the oils. Too much and the soap will go off. You could also add some vitamin E to extend the shelf life though.
Creating new recipes is a fun part of soap making and the idea of adding fresh Aloe Vera sound great. If you give it a try, let me know how it goes, as I have lots of Aloe in my garden.
Valerie